

JavaScript DOM Tutorial
Everything you need to know about the Document Object Model


Table of contents
When I started out as a web developer, people often threw around the term "DOM" in the industry. Every JavaScript tutorial mentioned it, but I didn't know what it meant.
The Document Object Model, or DOM for short, is a very important concept to understand and I am going to explain what the Document Object Model is in plain and simple English.
What is the DOM?
Imagine this: you have the TV on. You don't like the show that's being streamed, and you want to change it. You also want to increase its volume.
To do that, there has to be a way for you to interact with your television. And what do you use to do that?
A remote.
The remote serves as the bridge which allows you interact with your television.
You make the TV active and dynamic via the remote. And in the same way, JavaScript makes the HTML page active and dynamic via the DOM.
Just like how the television can't do much for itself, JavaScript doesn't do much more than allow you to perform some calculations or work with basic strings.
So to make an HTML document more interactive and dynamic, the script needs to be able to access the contents of the document and it also needs to know when the user is interacting with it.
It does this by communicating with the browser using the properties, methods, and events in the interface called the Document Object Model, or DOM.
For example, say that you want a button to change colours when it gets clicked or an image to slide when the mouse hovers over it. First, you need to reference those elements from your JavaScript.
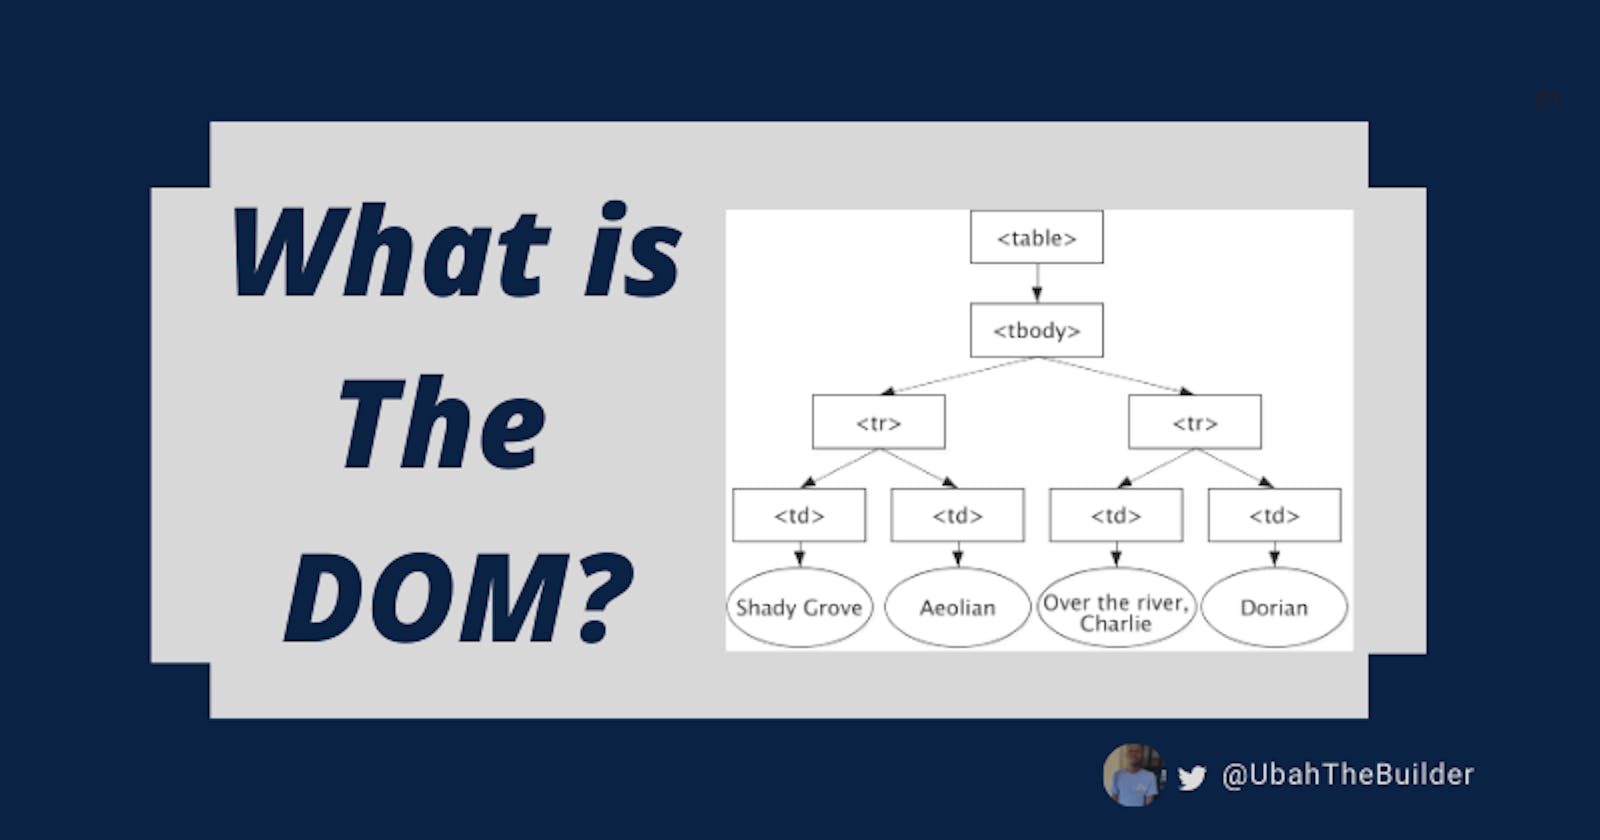
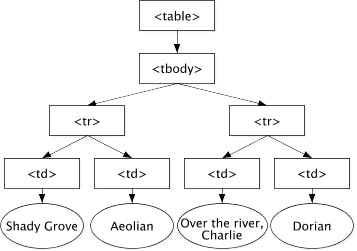
The DOM is a tree-like representation of the web page that gets loaded into the browser.
It represents the web page using a series of objects. The main object is the document object, which in turn houses other objects which also house their own objects, and so on.
The Document Object
This is the top most object in the DOM. It has properties and methods which you can use to get information about the document using a rule known as dot notation.
After the document, you place a dot followed by a property or method.
Let's look at a simple demonstration that shows how a script can access the contents of an HTML document through the DOM:
<h1>Login to your account</h1>
<form name=”LoginFrm” action=”login.php” method=”post”>Username
<input type=”text” name=”txtUsername” size=”15”/> <br/>Password
<input type=”password” name=”numPassword” size=”15”/> <br/>
<input type=”submit” value=”Log In” />
</form>
<p> New user? <a href=”register.php”> Register here</a>
<a href=”lostPassword.php”> Retrieve password </a>
</p>
var username = document.LoginFrm.txtUsername.value //Gets the username input
Alright. That's the HTML a login form. You can access all of these elements in JavaScript with the set of properties and methods the DOM API provides. But what are those methods?
In addition to the property and method included in the code snippet, let's take a look at some of the other popular ones:
The querySelectorAll() method
You use this method to access one or more elements from the DOM that matches one or more CSS selectors:
<div> first div </div>
<p> first paragraph </p>
<div> second div </p>
<p> second paragraph </p>
<div> another div </div>
var paragraphs = document.querySelectorAll( 'p' );
paragraphs.forEach(paragraph => paragraph.display = 'none')
The createElement() method
You use this method to create a specified element and insert it into the DOM:
<div>first div</div>
<p> first paragraph</p>
<div>second div</div>
<p>second paragraph</p>
<div>another div</div>
var thirdParagraph = document.createElement('p');
The getElementById() method
You use this method to get an element from the document by its unique id attribute:
<div id='first'> first div </div>
<p> first paragraph</p>
<div>second div</div>
<p> second paragraph</p>
<div>another div</div>
var firstDiv = getElementById("first")
The getElementsByTagname() method
You use this method to access one or more elements by their HTML tag name:
<div> first div </div>
<p> first paragraph</p>
<div> second div</div>
<p>second paragraph</p>
<div>another div</div>
divs = document.getElementByTagname("div");
The appendChild() element
You use this element to access one or more elements by their HTML tag name.
It adds an element as the last child to the HTML element that invokes this method.
The child to be inserted can be either a newly created element or an already existing one. If it already exists, it will be moved from its previous position to the position of the last child.
<div
     <h2>Mangoes</h1>
</div>
var p = document.createElement( 'p' );
var h2 = document.querySelector( 'h2' );
var div = document.querySelector( 'div' );
h1.textContent = 'Mangoes are great...'
div.appendChild('p');
The innerHTML property
You use this property to access the text content of an element.
The addEventListener() method
This property attaches an event listener to your element.
It takes a callback which will run when that event is triggered.
<button>Click to submit</button>
var btn = document.querySelector( 'button' );
btn.addEventListener( 'click' ,foo);
function foo() { alert( 'submitted!' );
btn.innerHTML = '';
}
The replaceChild() property
This property replaces one child element with another new or existing child element. If it already exists, it will be moved from its previous position to the position of the last child.
<div>
<h1>Mangoes</h1>
</div>
var h2 = document.createElement( 'h2' );
var h1 = document.querySelector( 'h1' );
var div = document.querySelector( 'div' );
h2.textContent = 'Apple';
div.insertBefore(h1, h2);
The setAttribute() method
You use this method to set or change the value of an element's attribute.
Suppose we have an attribute “id” containing the value “favourite.” But we want to change the value to “worst” Here's how you can do that with code:
<div>
<h1 id='favourite'>Mangoes</h1>
</div>
var h1 = document.querySelector( 'h1' );
h1.setAttribute(div, 'worst');
The node method
Every element in an HTML page is known as a node.
You can access any element by using the following properties with the node object:
- node.childNodes – accesses the child nodes of a selected parent
- node.firstChild – accesses the first child of a selected parent
- node.lastChild – accesses the last child of a selected parent.
- node.parentNode – accesses the parent of a selected child node.
- node.nextSibling – accesses the next consecutive element (sibling) of a selected element.
- node.previousSibling – accesses the previous element (sibling) of a selected element
<ul id-“list”>
<li><a href= ”about.html”class = ”list_one”> About</a></li>
<li><a href= ”policy.html”> Policy</a></ li>
<li><a href= ”map.html”> Map</a></ li>
<li><a href= ”Refund.html”> Refund</a></li>
</ul>
var list = document.getElementsById( “site-list” )
var firstItem = list.childNodes[0].childNodes[0];
Summary
The DOM is a top down representation of all the elements that make up a web page. It's the interface through which your script interacts with your HTML.
There are many properties and methods which you can use to get information about the DOM and manipulate it.
Thanks for reading till the end. Check out other articles in this series to learn more about JavaScript.